Trying to figure out how to correctly install and use the canister filter that you recently purchased for your aquarium? You’re probably wondering where all of the various parts go and what purpose they serve in the assembly.
All the components involved are, in fact, crucial to the canister filter, and setting them up correctly is necessary for its proper functioning.
By the end of this article, you will hopefully be able to identify all of its different parts and know their purpose as well as the most effective ways to assemble your canister filter.
Where Do You Put the Inlet and Outlet on a Canister Filter?
Practically, you have two choices to consider. The choice you make should be based on the shape, size, and arrangement of your aquarium.
Similar Sides Placement
Many individuals position the inlet and outlet on the same side. The ensuing water flow will readily cover the whole system, making this more suitable for smaller tanks. The water currents will generate a circular motion within the tank, guaranteeing optimum mobility and nutrition, warmth, and oxygen dispersion.
Bear in mind, though, that positioning the intake and output on the same side only works for smaller tanks as water can rapidly go from one to the other. Larger and broader systems cannot utilize this design since the water flow is insufficient to cover the entire surface.
This will result in an unevenly distributed of oxygen, dead areas, and irregular water currents. This brings us to our second alternative.
Lateral Sides Placement
This technique is better suited for larger tanks.
This design enables the efficient flow of water and uniform dispersion of current flow, oxygen, carbon dioxide, and warmth. Obviously, the effectiveness and dependability of the system depend on the tank’s design.
You do not want your plants or more delicate decorations to be close to your inlet or outlet. A strong enough stream might uproot plants or break branches and foliage. Additionally, they can effectively remove the substrates, causing the filtering system to create more issues than it solves.
Where Is the Intake and Output of a Canister Filter?
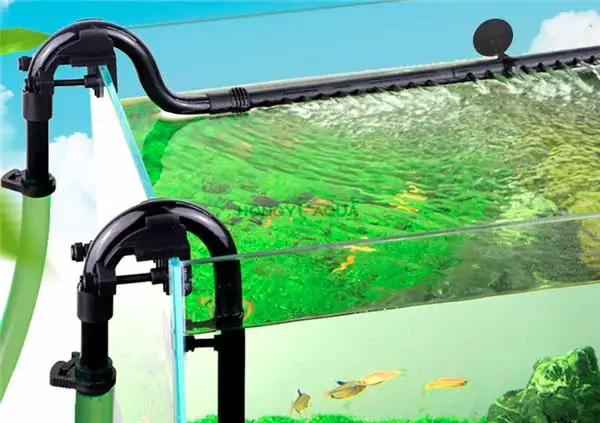
A canister filter is constructed out of a variety of different pieces. The three most important components are the pump, the input, and the outlet. The water is drawn into the intake manifold of the filter from the tank, while the water is drawn out of the output manifold of the filter.
After going through the process of becoming filtered in the canister filter, the water will be directed back into the tank through the output location or output nozzles.
The spray bar contributes to the creation of some movement in the water that is contained within the aquarium. Gravity is essential to the operation of the canister filter’s mechanism. Both the intake tube and the output nozzle are responsible for returning the water to the aquarium. The aquarium water is taken in through the intake tube.
What Is the Best Way to Set Up a Canister Filter?
To comprehend the positioning of the filter elements, you must know the entire equipment installation procedure. This straightforward procedure will assist you in installing the aquarium canister filter without difficulty.
1. Recognize Your Components
Remove everything in the packaging and consult the list of filter components. Make sure you have all the components before beginning the filter installation. If your shipment contains filter media, ensure that all of them are undamaged and in usable condition.
2. Tank Preparation
You must select an ideal location to install your canister filter. Remember, for optimal results, the filter must remain well below level of the tank. The typical location for canister filters is 4.5 feet below the water level.
You need to mount your tank as high as possible so that the pipe can reach it properly. Before fitting the filter, the piping would need to be devoid of bends and loops. This allows the hose to enter the tanks without difficulty.
3. Filter Preparation
Begin preparing the filtering medium for the canister filter at this point. Withdraw the filtration motorhead and confirm that all medium containers or trays are contained within. Prepare all desired media, classify them, and make them ready for layering.
4. Mechanical Media Installation
Put mechanical media in the filter’s first tray. As the filter takes water from the tank, it passes its first tray and then successive layers, getting cleaner with each.
Debris and rubbish would be trapped before the chemical and biological stages. Each layer screens out microscopic particles, preparing them for the next phase.
5. Biological Media Installation
Fill the next plate with biological filtering material. Bio-balls and ceramic rings are both popular. Filter sacks can hold biological medium. Placing trays near a biological filter medium won’t affect them.
6. Install chemical media
Lastly, add chemical media. You can also mix in normal ones. Filter loose granules with a bag.
7. Intake Placement
Set the intake. Some filters incorporate a tank connector for easy hose placement. Attach it to the tank. Loosen the input screw on the canister filter, attach the hose to the intake system, and secure the clamp.
Next, run the hose to the aquarium and disconnect it. Now attach the tube. Connect the pipe to an intake hose. Follow the 3-inch guideline if the filter’s handbook doesn’t specify how long the hose can reach. The tubing should be 3 inches from the tank foundation.
8. Output Placement
This step is just like positioning the intake. Connect the pipe and canister filter, cut it, and move it to the fish tank. Position the output nozzle 1″ below the water level.
You can adjust the output opposite the input. Keeping the output across the intake manifold would imply water enters one way and leaves another. However, placing them on one side will tidy up your aquarium and streamline hosing.
9. Start Filtering
After everything has been integrated, double-check all of it. Unlock valves so that water can flow easily through the filter. Now, activate your filter and watch it work.
Final Thoughts
That hope that with the aforementioned information, you are now better acquainted with setting up your canister filter. While it may appear tough to set up the equipment on your own, the method is straightforward if you follow the steps precisely.


